Tuesday, June 5, 2012

Painted Herb Pots and Pokes

I had a dear friend visit with me for the day.. we had a blast Painting My Herb Pots and making Plant Pokes... We did a lot of giggling. K Found humor in a number of things about this project.. not the least of them being my doing anything to do with Plants. K was born with two green thumbs while I am sporting two brown ones. No one with any sense would ever accuse me of being botanically inclined, believe me. I give the word Herbicide a whole new meaning.

I am botanically challenged **Admitting you have a problem is the first step** but lets put that aside for a bit and get on with the project at hand.. These lovely Herb Pots and pokes.

You will Need:
1:From the Garden Center: You will require three Terra Cotta Rose Pots, I used the medium sized variety... Don't ask me what size they are... Oh wait!... the size is on the tag that was stuck to the bottom... they are 6 inch pots and 4 inch saucers.
Three Herbs.... of your choice.. I Have not selected my victims, I mean plants as yet.

2: From "www.decoart.com":
Deco Art All purpose Primer sealer,Warm White Paint,DecoArt Decoupage Medium (Matt), Asphaltum paint, Duraclear Satin or Matt Varnish ( as per your preference)Deco Art Chalk Board paint.

3: From "www.graphicsfairy.blogspot.ca"
Three vintage graphics, Reversed (Only if Text or numerals are involved)

4: From "www.Stockade.ca" you will need:
3x 2inch square scroll tags

5:Dynasty Faux Squirrel Brushes:
3/4 flat, #2 Round, #2 Rigger

6: Misc:
Shop Towel, Water, White Graphite paper, Printed lettering ( Thyme, Basil, Parsley etc), L'Acrobate Glaze.( www.tracymoreau.com)

To Start: Mix Warm White paint 1:1 with some All Purpose Primer sealer. Mix well. Begin by applying a generous coat to the INSIDE of each pot. If you want the paint on the outside to remain in good shape over time, you have to seal the ENTIRE Pot inside and out, to prevent moisture from getting behind the paint. Set them aside to dry. Terra Cotta is VERY porous, so it will dry pretty quick. Then apply a coat to the outside of each pot. The sealer makes the paint a bit transparent, so three coats will likely be required to get good coverage.We are looking for a nice opaque coat. Let dry thoroughly ( I put mine under the fans for about 1/2 an hour.. that seemed to do the trick.)


Once the pots were dry I Cut out the reversed Image as close to the edge of the image as i could get and adhered ( Face Down) them to each pot with a generous coat of Decoupage Medium. I did NOT apply any OVER the the image, I just used it to stick the paper to the pot!I put them back under the fans for a bit to dry the decoupage medium well before the next step.
I then used a terry cloth face cloth to gently scrub the paper off the pots, leaving the Transferred image on the pot.


Once all the Paper has been scrubbed off, let the pots dry for a few minutes before applying a coat of the decoupage medium over the entire pot, just to seal the image on.Let it dry Thoroughly.


Use a Little Asphaltum Paint thinned with L'Acrobate to apply a weak layer of antiquing over the White paint. Let them dry thoroughly.

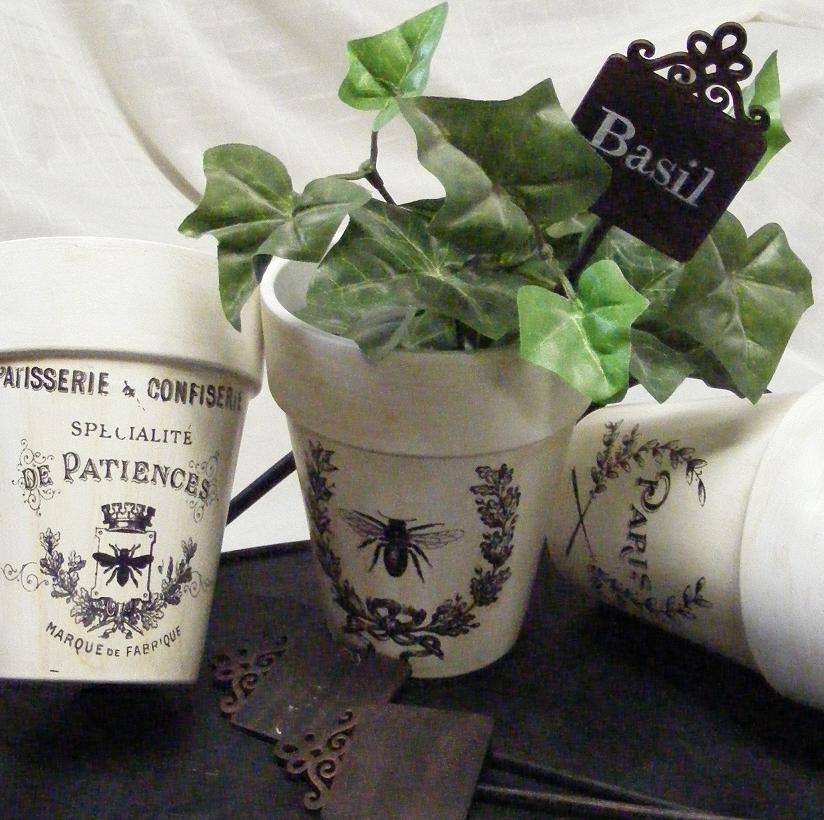
I Used some Deco Art Chalk Board Paint to base the Small tags and the Skewers,I traced the lettering onto the tags and then used the #2 Rigger to paint the lettering with Warm White then I glued the skewer to the back of the tag with a glue gun! You Can just leave them Blank and use chalk to write in whatever you like!!

I grabbed a handful of foliage out of the Silk Arrangement(and Yes I know it's NOT Basil) on my China Cabinet to add a little colour ( I Told you I haven't selected my victims yet) and stuck in the Plant poke... And Voila!! Perfectly Pretty Herb Pots and Pokes!!


If you want to see a step by step demo of this image transfer technique.. here it is:

Tuesday, April 3, 2012

Relief Stencilling Your Kitchen Cabinet Doors.

If you ever wondered how to update your cabinetry , within a budget and end up with something that you can live with for a long time to come.... I have the answer.it takes a few steps , but in the end it will have been worth it. This is the beginning of our Kitchen makeover, we'll post more as we go...for now this is just the first step.

step 1: Convincing your husband that Painting those tired 80's oak cabinets is the best idea to refresh your Kitchens appearance .... it's easy to accomplish, call in three of the most expensive cabinet makers in town to quote you on your "Refreshment Project"... Hubby's reluctance to "Paint Good Wood" will rapidly disappear.

Step 2: DO NOT allow hubby to select the paint colour, but you must drag him to Home Depot, and ask for his opinion and reject each one until he reaches the colour you prefer.

Step 3:Once you have hubby select the sample that you have clearly indicated as your choice. Come to a mutual understanding that your choice is quite obviously the best one, and congratulate him on his excellent taste.

Step4:Pack Suitcase.

Step:5 Before leaving for your SPA weekend with the girls,:make a list to remind hubby to remove all the hardware, clean, sand and prime the doors and boxes of all the cabinetry, and apply three coats of your colour choice to the lower cabinets, while you are away.


Step 6: Enjoy facial, Massage, manicure and pedicure, then dinner with the girls. Drink wine. Email hubby for update on his progress.Ask for pictures.

Step 7: Show pictures to the girls, Respond to email with compliments from Girlfriends, thank girlfriends with more wine.

Step 8: Enjoy final day at the Spa and celebrate the progress in your kitchen with more wine with Girlfriends. Return home.

Step 9: Now That the hard work is done ...it is time to do the pretty stuff.We have chosen to do a stencil relief on the center panels of the Upper cabinets.So we tested the Finish on an old door, but a piece of MDF will work too.


Pictured above are the materials that I used for our Kitchen cabinet redo.... A little texture Stucco.... my favorite stencil... and "Hubby" Primed Cabinet doors. I used one of my favorite palette knives but , if your more comfortable with a taping knife than by all means use it!

Step 10:Start by taping your stencil in place on the primed surface,( a small piece just to hold it steady) then using the knife, apply a thin coat of the Stucco over the image of the stencil. Carefully remove the stencil and let the stucco dry before repositioning the stencil. Repeat this for each door and allow it to dry well.

Step 11:Lightly Sand the stencil relief to remove any sharp or loose bits, and to smooth out any rough edges. The Stucco is very hard when dry so you can be fairly aggressive with the sanding.

Step 12:Have Hubby Apply two to three coats of Your colour of choice over the relief letting ech coat dry thoroughly before applying the next.


Step 13: Have hubby Spray the existing hardware with a metal paint, the colour of your choice. Encourage hubby by reminding him that this team effort will be worth it!!

Fortunately for me , My husband has a sense of humour and enjoys DIY as much as I do...We'll post more as the cabinets are completed but thought you might enjoy this quick tutorial.
Thanks for playin in our sandbox!!

Tracy and Chuck

Monday, March 26, 2012

Spring is sprung
Da grass is riz
I wonder where dem boidies iz
Da little boids is on da wing
Ain't dat absoid
Da little wings is on da boid

Ogden Nash but most Likely Anonymous ( there seems to be some confusion as to the author)

Spring and fall are my favorite seasons... Fall with it's rich colours and crisp air,while But Spring...Now spring is full of promise and renewal.
Both seasons heavily influence my artwork. I was feeling springy today, even though it feels like January with the cold wind and the flurries today. I wanted colour, and fun and these fun tags just did the trick!
After so much traveling the past few weeks it was a pleasure to just sit and paint something fun and easy!
These will be on my site as well as available from Viking Woodcrafts, ( http://www.vikingwoodcrafts.com )and Dynasty Brush. ( http://www.dynastybrush.com ) Enjoy!


Thanks for playin in my sandbox! Tracy

Sunday, February 26, 2012

Well , In a couple of Days I am off to Las Vegas, So if you are on the Trade floor PLEASE come by and see me!! You can find me in the DecoArt Booth, Playing with NEW Products and doing technique Demos and answering  questions so if you have any feel free to ask!!I am looking forward to seeing you there.

For those that aren't going to be there... Here's a little something. While I am away.. Try your hand at one of these little projects.


Sunday, February 19, 2012

One of my Favorite parts of my Work is having the Opportunity to try out NEW PRODUCTS!! Of course BRUSHES are an artists bread and butter so it stands to reason that trying out the Newest and Coolest brushes available is the best part!! ( I LOVE MY WORK!!)
So this week I had the Pleasure of Working with "The Dynasty Palmer"

White Bristle Palmer
They are available is a variety of Sizes,Bristle types and Styles and are easy to work with, when used with a variety of Media!  Below are a couple of FREE patterns for you to Download, that use the PALMER. Though they are in NOW WAY limited to just what I have done Here. They ROCK Faux Finishes like Stria, and Wood Graining.. and the WAVE Versions are Awesome for Marbles and other stone finishes.
Wave Palmer Wood Grain


Wave Palmer Marbles
I had too Much fun with these Palmer Brushes.. You have to try em out!!  So DOWNLOAD the Patterns Below, and  Go Check out   DYNASTY BRUSH for more ideas , How to Videos and a whole lot of GREAT Brushes and Inspiration!!

Tuesday, February 7, 2012

A Quick Tutorial On doing Image Transfer with DecoArt Decou-Page!!

The FREE E Pattern I posted seems to have generated a LARGE volume of questions this week... So I thought I would post a video Tutorial for this Image transfer technique!  Have fun with it!!


If you're looking for the Free E Pattern you'll find it on my website  http://www.tracymoreau.com
under FREE E Patterns!!

Have a great week All !!

Saturday, February 4, 2012

Still Stuck.. in a good way!!

Ok so it has been a busy week, but I am back in the studio and thought after reading a Stack of messages about the last post, that you would like a quick pattern for the Image transfer technique!! So try your hand at this pretty baguette tray. It's really easy to do and quite effective!!

It is available on my Website, under FREE E PATTERNS. TRACYMOREAU.COM  So get yourself a bottle of DECOUPAGE From DecoArt and go down load the pattern!!

The Tray is available at VIKING WOODCRAFTS !

HAVE FUN!!

Thursday, January 26, 2012

Stuck .. in a good way!

Every Once in awhile a New product comes along that just grabs you... it gets you playing. You find yourself thinking Ohh I can this.. Or this.. Oooh OR THAT!  and one idea after another comes to mind. I found that with the textures from DecoArt.. and they STILL do that.. but recently I realized that I am STUCK on "Decoupage". I LOVE this medium.

I have used just about every Decoupage medium/modpodge/Glue I can think of and NONE have been as easy to use,or as versatile as the "De-cou-Page" from Deco Art. It has little to no odour, it washes up with soap and water, it's tintable, is available in TWO sheen levels ( Gloss and Matt) and it has a tremendous spread rate. I haven't figured out exactly HOW many feet to a bottle... mainly because I haven't hit the bottom of the bottle yet. 
I keep finding fun and interesting things to do with this medium and today I learned a new one! and I am THRILLED.. IMAGE TRANSFER!!

Most of us have worked with Transfer gels and mediums, Some have a bigger learning curve than others, some are smelly and messy, and some are just a nightmare to work with but in the end they all work. I discovered the other day that the De-cou-page will image transfer and soooo easily. I was giddy!


Step one:If your working on an art piece .. paint the area to the final step ( no shading you'll do that after) This will work on almost any base coated surface!)

Step two: Use a laser copy of the image you want to transfer( Reverse the image, particularly if it has Text or Numerals)

Step Three: Trim the image you want to transfer to fit the shape of the area you want to transfer to.( If you make it smaller, you may end up with edges that show) Or tear the paper to the smaller shape so that you don't have any straight edges.


Step four: Apply a Generous coat of the De-cou-Page to the surface. Lay the paper FACE DOWN into the wet medium. Roll it with a Brayer to smooth it out and remove bubbles and excess medium.( Wipe the excess away with a damp cloth.)Let it dry Thoroughly!

 
Step Five: With a very moist terry cloth face cloth, gently moisten the paper and then gently scrub it away until you can clearly see the image. Let it dry.


Step Six:Apply another coat  of the De-cou-page to the surface and let dry.

Step Seven: Go Ahead and add all your shadows and Highlights to your piece!! VOILA!!  Easy Image Transfer!

Get yourself a bottle in your choice of sheen and try this technique!! it can be done on all kinds of painted surfaces!! ( And TEXTURES too!!)

Tuesday, January 3, 2012

Creative Adrenaline

Alrighty then... we are three days into the New Year and I haven't painted a thing. In fact aside from a few cute little Christmassy things I haven't painted in over a month!!! I was creativly drained... I had nuthin', Nada, Zip, bupkiss. No Umph at all!

Then On New Years Day.. I was sitting at my computer, obsessively perusing Pinterest as I am wont to do, When I felt that familiar Niggle, that tickle, that little oh oh oh oh!!

And now I have a stack of drawings on my table, and no idea what to do first!! I have chosen my palettes, I have chosen surfaces, and decided on scale.... Now all I have to do is decide where to start!!! sigh.


I love that rush of Ideas, That burst of creative adrenaline that seems to be the norm for me. It always works that way. I could be thumbing through a book, or a magazine,even those that are not art or painting related and a light comes on... then another and another... and then I work until, one at a time, the lights go out. Then the process begins again.

I am determined this year to spend more time perusing and searching for Inspiration, it's out there... just waiting for us to find it!! I have always been a collector... I keep books, magazines, greeting cards, napkins, post cards, catalogs, photos, bit's of fabric, stone , glass, wood, paper. I tuck them into folders and binders and once in awhile I flip through them...then I feel the niggle.. that little tickle that tells me I am on to something.. and away I go again.
With the advent of Social Networking and sites like Pinterest Now I can collect digitally too!!!  

From time to time it is not something tangible like a shape or a theme that sets the ball rolling, it is a colour itself that does it... for me the Colour "Tuscan Red" was the jumping off point for the piece to the right.. it just evolved from there.
Of course I am particularly fond of the European theme so my work tends to reflect that.

So this year I am resolved....to take advantage of the creative opportunities that abound, to paint, create , design and share everyone of them! I intend to stretch... to push myself to the next level and I intend to have a great time doing it too!!  I invite you to Share your creative journey with the rest of us!! Send pics... send your thoughts, your comments!!  Participate!!  Share with your craft and painting friends!!

So my question for you, What is your creative process?  What stirs your juices?, What gives you that Burst of Creative Adrenaline? Let us Know... it's always nice to know your not alone, on any journey...especially a creative one!!  

Happy New Year!!